Inline Motor Screen
Important
Make sure the PCASpy tutorial server is running
For this screen, we want to present useful information to the user to operate the motors, and also provide a way for them to access other less-commonly-used parameters via an “Expert” screen. To make this screen reusable in other displays, it will be necessary to use Macro Substitution that will later be replaced by the proper information for each motor.
The finished result will look like this:
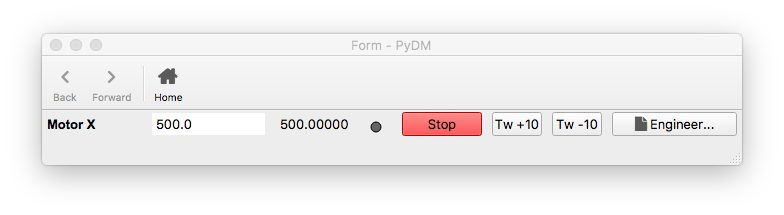
Inline Motor Screen
Step 1.
Let’s start by opening Qt Designer and creating a new
Widget.
Step 2.
With the new form available, let’s add a GridLayout widget to it. To make it fill the whole form let’s select
Layout Verticallyfor the form.
Step 3.
Now that we have a layout, let’s take a look at the widgets on this screen:

Step 3.1.
The first
PyDMLabelwill display the description of the motor:Drag and drop a
PyDMLabelat the previously addedGridLayout.Set the
Channelproperty of this label to:ca://${MOTOR}.DESC.${MOTOR} is a macro that will later be replaced by a value sent by screens using this widget in embedded displays, related displays, or when launching using the command line.
Set the
displayFormatproperty of this label to:String.Expand the
Fontproperty and mark the checkbox forBold.
Step 3.2.
The second widget is a
PyDMLineEditwhich will be used to set the desired position for the motor:Drag and drop a
PyDMLineEditinto theGridLayouton the side of the previously addedPyDMLabel(Note: The border will become blue showing that the widget will be placed on the side and not on top or under the other widget).Set the
Channelproperty of this line edit to:ca://${MOTOR}.VAL.Change its
displayFormatproperty toDecimal.Expand the
sizePolicyproperty and setHorizontal PolicyandVertical PolicytoFixed.This will make the widget respect the size on screen.
Expand the
minimumSizeproperty and setWidthto75.This property will indicate the minimum size constrains for the widget and avoid this widget from being hidden or reduced to an unusable size on window resizing.
Step 3.3.
The third widget is a
PyDMLabelwhich will be used to monitor the readback value for the motor:Drag and drop a
PyDMLabelat theGridLayouton the side of the previously addedPyDMLineEdit.Set the
Channelproperty of this line edit to:ca://${MOTOR}.RBV.Change its
displayFormatproperty toDecimal.Expand the
sizePolicyproperty and setHorizontal PolicyandVertical PolicytoFixed.This will make the widget respect the size on screen.
Expand the
minimumSizeproperty and setWidthto75.This property will indicate the minimum size constraints for the widget and avoid this widget becoming hidden or reduced to an unusable size when a user resizes the window.
Step 3.4.
The fourth widget is a
PyDMByteIndicatorwhich will be used for visual feedback that the motor is moving:Drag and drop a
PyDMByteIndicatorinto theGridLayouton the side of the previously addedPyDMLabel.Set the
Channelproperty of this line edit to:ca://${MOTOR}.MOVN.Turn off the
showLabelsproperty since we are only interested on the color for this widget.Set the
circlesproperty so we have a circle instead of a square.Expand the
sizePolicyproperty and setHorizontal PolicyandVertical PolicytoFixed.Expand the
minimumSizeproperty and setWidthandHeightto32.Repeat the same previous step for the
maximumSizeproperty.
Step 3.5.
The fifth widget is a
PyDMPushButtonwhich will be used to stop the motor:Drag and drop a
PyDMPushButtonat theGridLayouton the side of the previously addedPyDMByteIndicator.Set the
channelproperty of this line edit to:ca://${MOTOR}.STOP.Set the
pressValueproperty to1.This is the value that will be written to the channel once the button is pressed.
Set the
textproperty toStop.Expand the
sizePolicyproperty and setHorizontal PolicytoMinimumand theVertical PolicytoFixed.Set the
styleSheetproperty tobackground-color: red;in order to give the button a nice look and feel and bring the attention to it in case of emergency.
Step 3.6.
The sixth widget is also a
PyDMPushButtonwhich will be used to tweak the motor a certain distance in the positive direction:Drag and drop a
PyDMPushButtoninto theGridLayouton the side of the previously addedPyDMPushButton.Set the
channelproperty of this line edit to:ca://${MOTOR}.VAL.Set the
pressValueproperty to10.Set the
relativeChangeproperty so the new value written to the channel will be relative to the channel’s current value.Set the
textproperty toTw +10.
Step 3.7.
The seventh widget is also a
PyDMPushButtonwhich will be used to tweak the motor a certain distance in the negative direction:Drag and drop a
PyDMPushButtoninto theGridLayouton the side of the previously addedPyDMPushButton.Set the
channelproperty of this line edit to:ca://${MOTOR}.VAL.Set the
pressValueproperty to-10.Set the
relativeChangeproperty so the new value written to the channel will be relative to the channel’s current value.Set the
textproperty toTw -10.
Step 3.8.
The final widget is a
PyDMRelatedDisplayButtonwhich will be used to launch the engineer screen so users can configure advanced parameters and troubleshoot possible issues with the motor:Drag and drop a
PyDMRelatedDisplayButtonat theGridLayouton the side of the previously addedPyDMPushButton.Set the
textproperty toEngineer....Add the string
exper_motor.uito thefilenamesproperty.Note
We will create the
expert_motor.uifile in the next section.Set the
openInNewWindowproperty so the screen will show up in a standalone window.Expand the
minimumSizeproperty and setWidthto125andHeightto24.Repeat the same previous step for the
maximumSizeproperty.
Step 3.9.
After adding all the widgets to the layout, it will look like this:
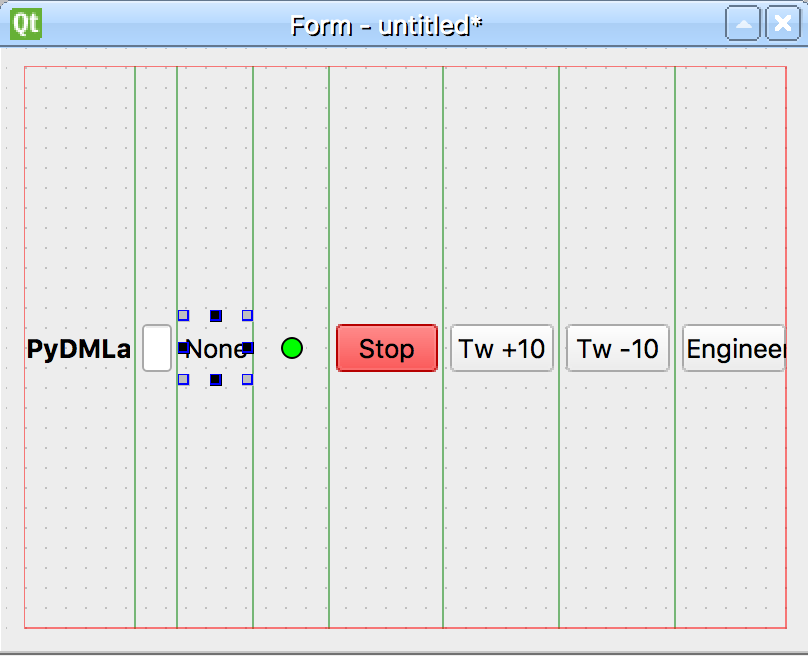
Let’s adjust the sizes and reduce the top and bottom margins on the layout.
Using the Object Inspector on the top-right corner, select the
gridLayoutobject and:Set the property
layoutRightMarginto5.Set the property
layoutBottomMarginto5.Set the property
layoutHorizontalSpacingto10.Set the property
layoutVerticalSpacingto5.
Using the Object Inspector on the top-right corner, select the
Formobject and:Expand the
geometryproperty and setWidthto700andHeightto32.Expand the
sizePolicyproperty and setVertical PolicytoFixed.Expand the
minimumSizeproperty and setWidthto700andHeightto32.Scroll all the way down on the property editor and set
layoutLeftMargin,layoutTopMargin,layoutRightMargin,layoutBottomMarginandlayoutSpacingto0so the form is very tight.Expand the
maximumSizeproperty and setHeightto38.
The end result will be something like this:

Step 4.
Save this file as
inline_motor.ui.Warning
For this tutorial it is important to use this file name as it will be referenced at the other sections. If you change it, please remember to also change it in the next steps when referenced.
Step 5.
Test the Inline Motor Screen:
pydm -m '{"MOTOR":"IOC:m1"}' inline_motor.ui
Note
You can download this file using this link.