Adding Code into the Main Display
Important
Make sure the PCASpy tutorial server is running
For this particular application it would be of interest to not only see the beam image on the screen, but to also calculate the maximum point on the image and display the coordinates in a label.
To do so, we will need to add some Python code to our main screen developed at the Main Screen section.
Since we already have the screen designed in the UI file, we can reuse it in our Python-based display, and hook up code to interact with widgets.
This is accomplished by subclassing pydm.Display (See Subclassing Display for more details).
Step 1.
Open a new text file. The first thing that we will do is add the imports needed for the code that will follow.
import time
from os import path
from pydm import Display
from scipy.ndimage.measurements import maximum_position
Step 2.
Let’s create our Python class that will inherit from
Display(See Subclassing Display).class BeamPositioning(Display): def __init__(self, parent=None, args=None, macros=None): super().__init__(parent=parent, args=args, macros=None) # Attach our custom process_image method self.ui.imageView.process_image = self.process_image # Hook up to the newImageSignal so we can update # our widgets after the new image is done self.ui.imageView.newImageSignal.connect(self.show_blob) # Store blob coordinate self.blob = (0, 0) def ui_filename(self): # Point to our UI file return 'main.ui' def ui_filepath(self): # Return the full path to the UI file return path.join(path.dirname(path.realpath(__file__)), self.ui_filename())
Breaking the class constructor code into pieces, we have:
Replaced the default
PyDMImageViewmethodprocess_imagewith our own custom method.Hooked up our
show_blobmethod to thenewImageSignalthat is emitted by thePyDMImageViewevery time a new image is displayed.Initialized the
self.blobvariable with (0, 0).Implemented a
ui_filenamemethod returning the name of theUIfile to be used and compose the screen.Implemented a
ui_filepathmethod returning the full path to theui_filenameso PyDM can properly load it.
Step 2.1.
Add code to the
process_imagecallback method so we can calculate the blob position.Important
The
process_imagemethod is defined in thePyDMImageViewwidget and more information about it can be found at the PyDMImage widget documentation page.Since this method runs in a separated
QThread, we shouldn’t manipulate widgets in this method, since this code runs outside of the Qt Main Thread.def process_image(self, new_image): # Consider the maximum as the Blob since we have only # one. self.blob = maximum_position(new_image) # Send the original image data to the image widget return new_image
In
process_imagewe call the scipy method maximum_position to calculate the coordinates for the maximum spot and save it toself.blob. At the end, this method returns the unmodified image, which the ImageView will display. If you’d like to manipulate the image before displaying it, you can do so in this method, and return the manipulated version.Step 2.2.
Add code to the
show_blobmethod so we update theQLabelwith the new blob position calculated inprocess_image.def show_blob(self, *args, **kwargs): # If we have a blob, present the coordinates in label if self.blob != (0, 0): blob_txt = "Blob Found:" blob_txt += " ({}, {})".format(self.blob[1], self.blob[0]) else: # If no blob was found, present the "Not Found" message blob_txt = "Blob Not Found" # Update the label text self.ui.lbl_blobs.setText(blob_txt)
Step 3.
Save this file as
main.py.Warning
For this tutorial it is important to use this file name as it will be referenced at the other sections. If you change it please remember to also change in the other steps when referenced.
Step 4.
Test the Main Screen:
pydm main.py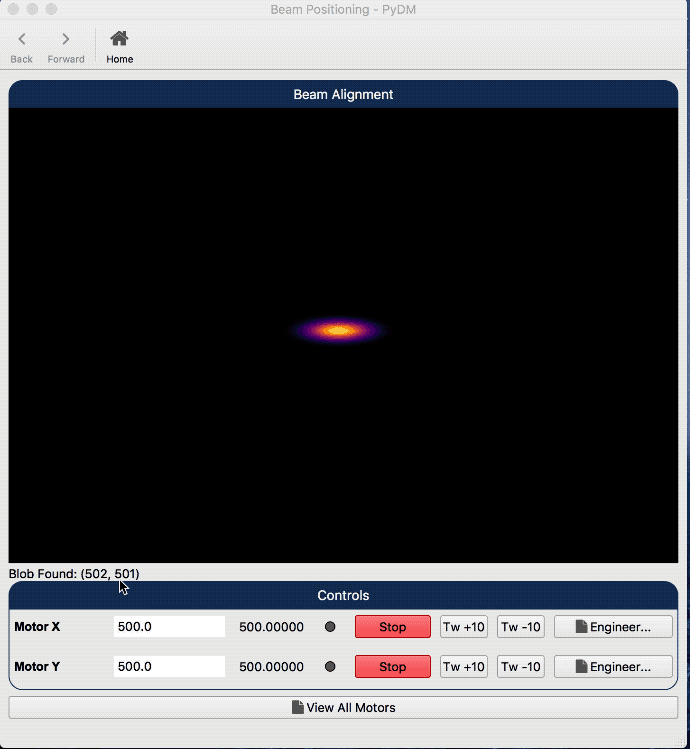
Note
You can download this file using this link.