Touch Up and Stylesheets
Let’s now do some touch up to make it more similar to the EDM screen. One of the ways we already discussed about is the use of an additional stylesheet besides the default one we already have with PyDM.
More about Stylesheets
As mentioned priviously, besides changing the stylesheet for individual widgets, we could create a .qss file with desired stylesheet properties and this can be applied for the entire screen.
There are many examples and a great amount of information online about different styles for different widgets. Whenever you want to change a style of a widget, you can simply search for QT Stylesheet for … PushButton for example and you can copy and paste those styles thay you find online into your own .qss file.
There are also free downloadable .qss files that others have created, with different themes.
In the .qss file that we previously created, let’s add some more styles for the following widgets. Please note that these are very basic styles that try to simulate a bit the EDM style:
PyDMPushButton:QPushButton { background-color: rgb(218, 218, 218); border: 2px outset rgb(156, 156, 156); border-radius: 5px; } QPushButton:pressed { background-color: rgb(199, 199, 199); border: 2px inset rgb(156, 156, 156); } QPushButton:hover { background-color:rgb(240, 240, 240) } QPushButton:checked{ background-color: rgb(199, 199, 199); border: 2px inset rgb(156, 156, 156); }
PyDMLabel:PyDMLabel { background-color: rgb(214, 214, 214); border-radius: 3px; }
PyDMLineEdit:QLineEdit { background-color: rgb(204, 204, 204); border-color: rgb(156, 156, 156); border-style: inset; border-width: 2px 1px 1px 2px; border-radius: 3px; } QLineEdit:hover { background-color: rgb(186, 186, 186) }
QComboBox:QGroupBox { border-radius: 5px; background-color: rgb(255, 255, 255); margin-top: 15px; } QGroupBox::title { background-color: rgb(255, 255, 255); }
Note
You can download the .qss file that we developed in this walk-through from this link
Now let’s try to open our display with this stylesheet again:
PYDM_STYLESHEET_INCLUDE_DEFAULT=1 pydm -m "DEV=MY:PV:HERE" --stylesheet my_style.qss mgnt_unit2.ui
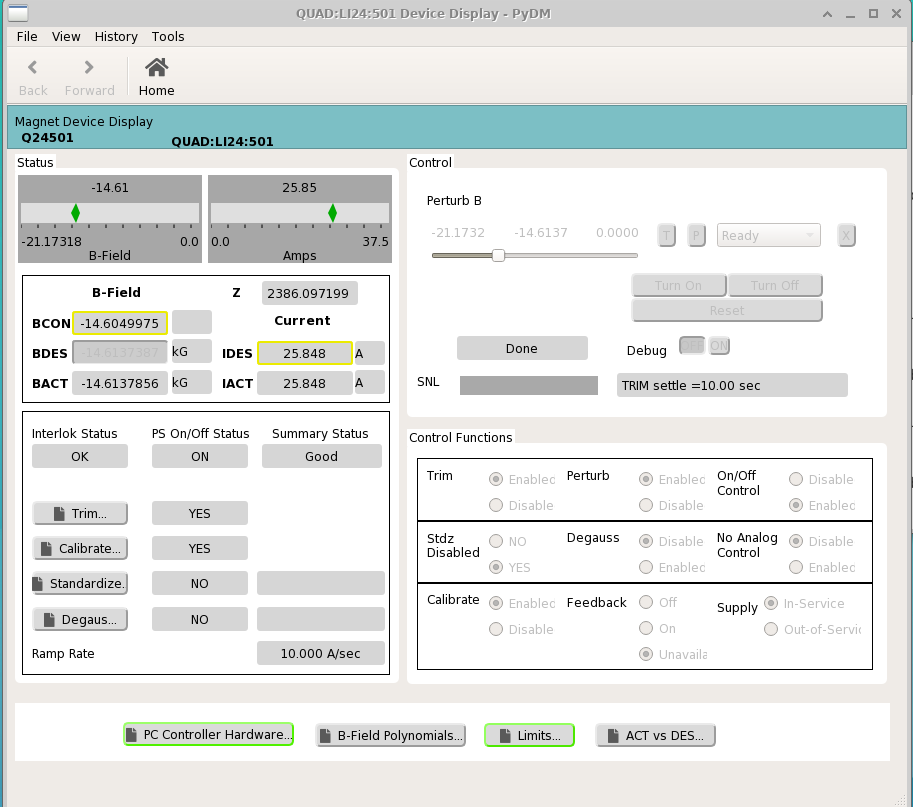
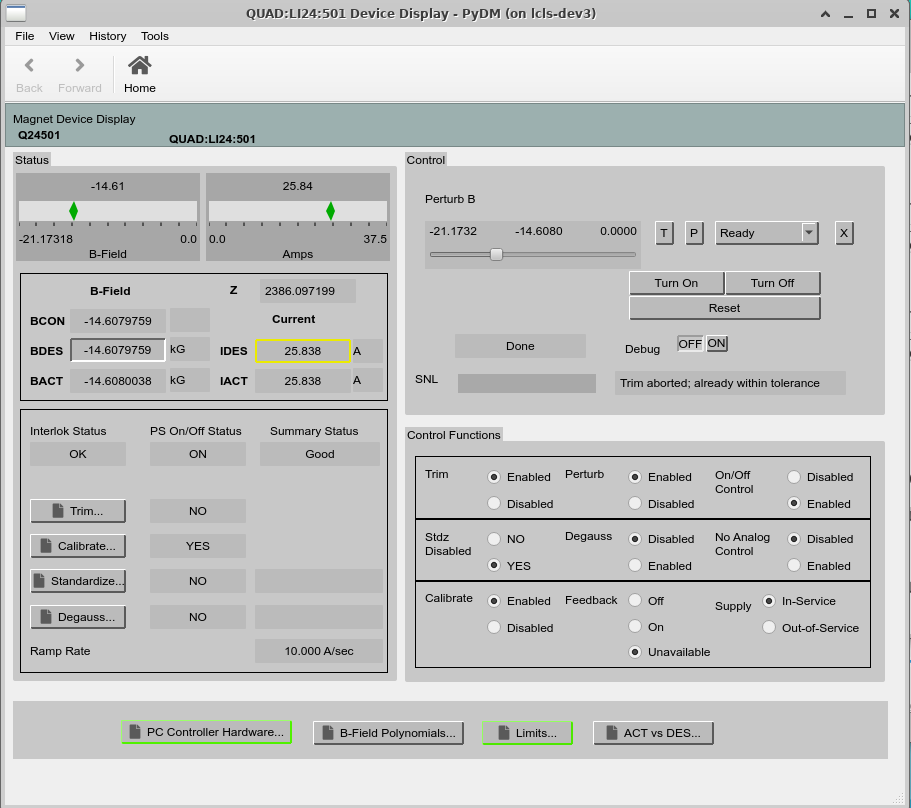
We should get something like this:
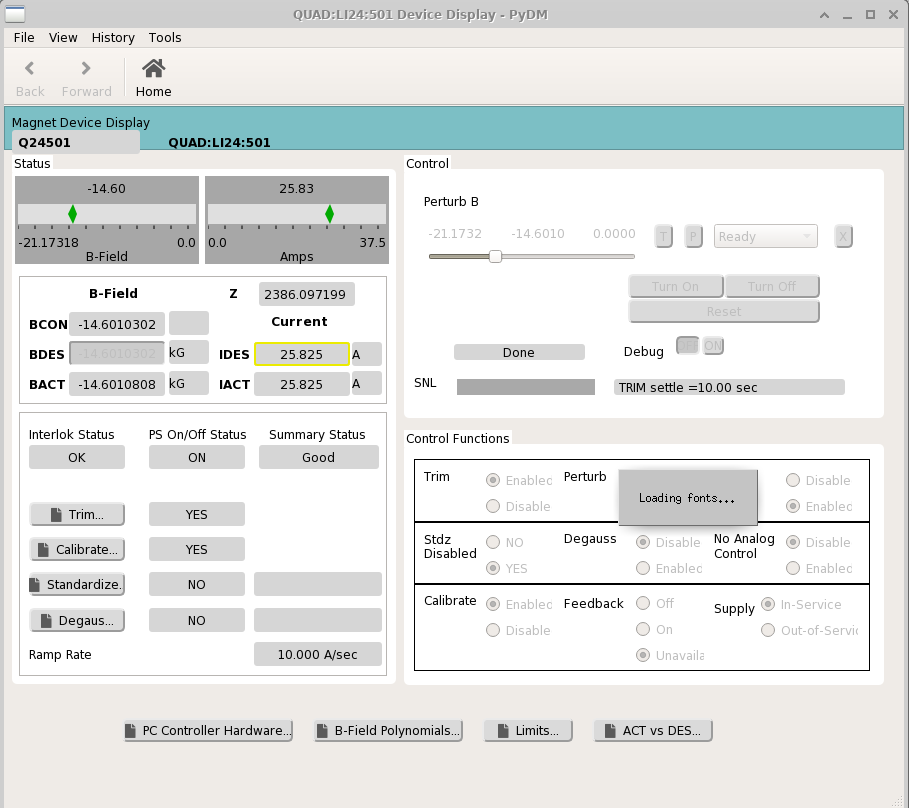
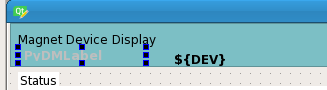
Notice how the PyDMLabel from the top-left corner now has a background color - let’s go back and change the color to match the banner color.
Before we do that, here is a trick we can use to make it easier on us in Qt Designer:
Note
Let’s add the information from our .qss file, into the main Form from our screen - this way we’ll have the same styles while working in Qt Designer. By adding them to the Form they will be applied to all the widgets, as the Form is the Top Level containing all the widgets:
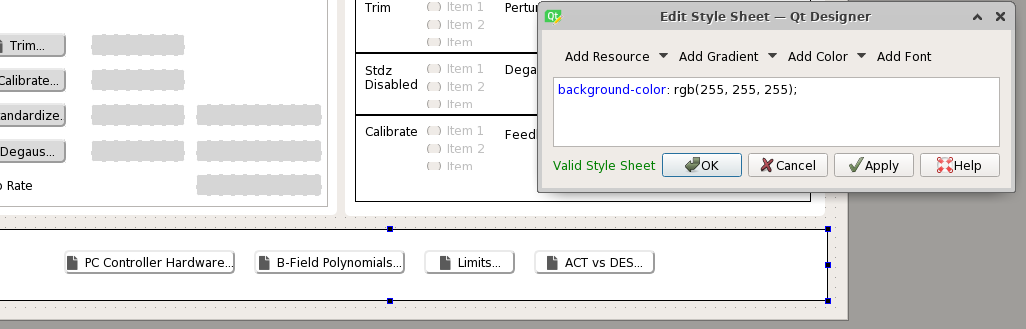
Right click on the
Formfrom the right side of theQt Designerunder theObject Inspectorsection above, and selectChange styleSheet..:
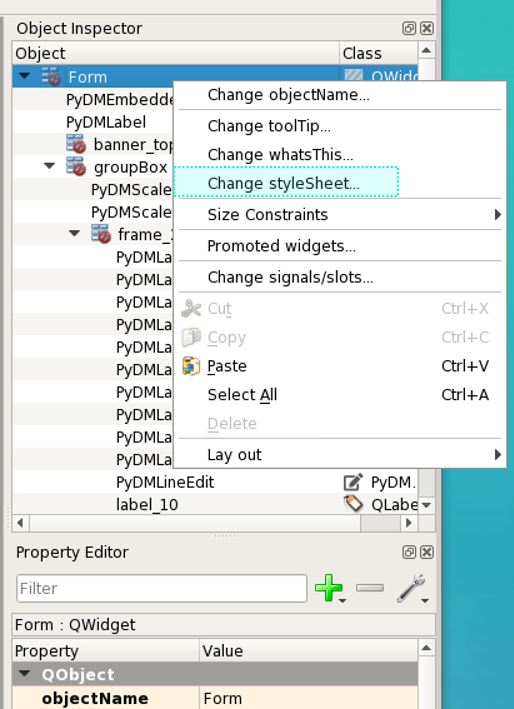
Copy and paste all the information from our
my_style.qssfile in here:
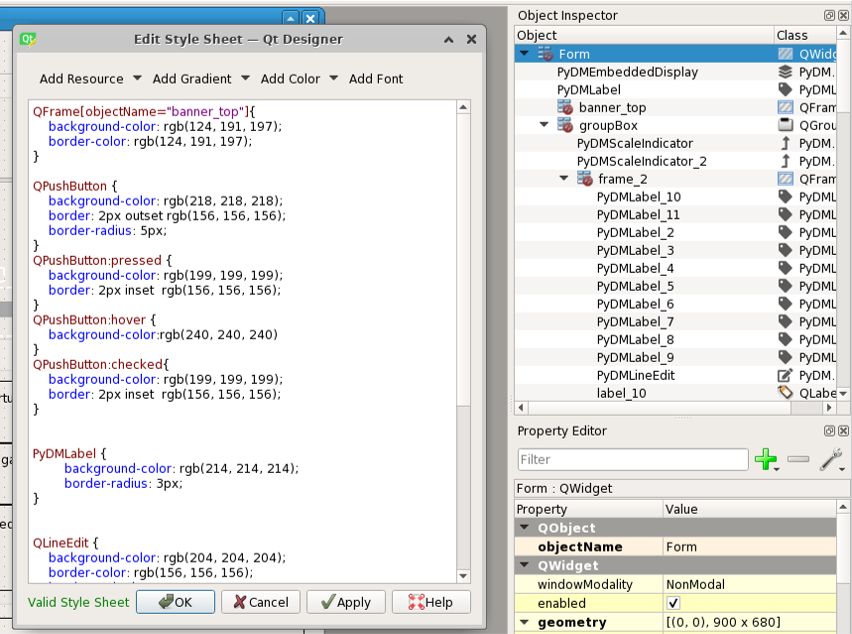
Click
Apply.
Important
Please remove the stylesheet from the Form after you are done with Qt Designer - it is not advised to leave it in there if we use a .qss file as this will take precedence over the .qss file and could cause style issues later on if we’re changing the .qss file.
Now let’s go back to our label and fix its background:
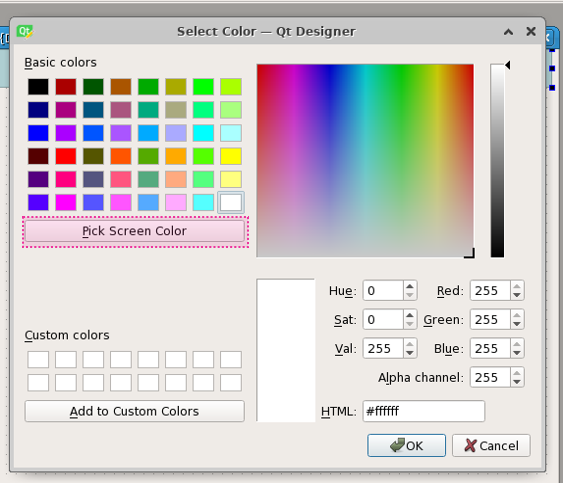
Right click on the label widget and choose
Change styleSheetfromQt Designer, from here let’s change the background-color and border-color:
Use the Pick Screen Color option and choose the banner color to make it easier:
Adjust the size a bit to align with the banner:
One other thing that we could try to simulate is the Embedded Display widget, adding a background color to it, follow the same steps above for this widget and choose a color for the background:
There are other things you can try to customize here but if you are happy with your screen, let’s get rid of the Form stylesheet from the Qt Designer as we do not need it anymore:
Go back to the Form’s
Change styleSheetoption, select all that is in there and hitDeleteon your keyboard.
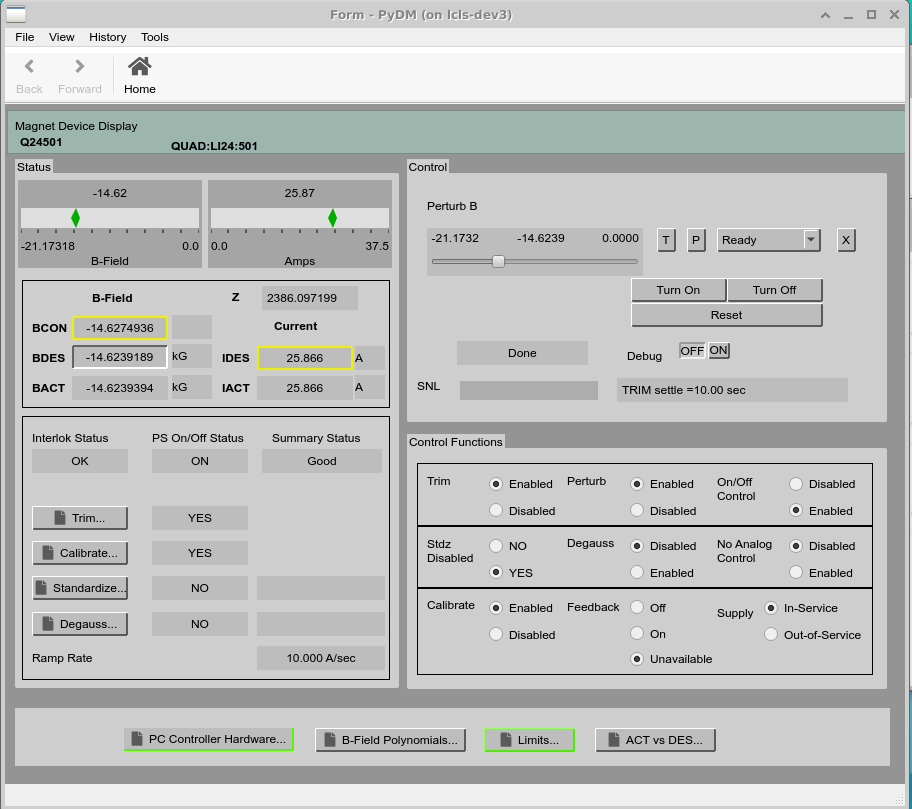
Open the screen again, and this is what we should have for now:
Old Style
Now, some folks at SLAC still prefer the EDM stylesheet over the default PyDM stylesheet or any other stylesheets, here is a .qss file that you can download and use instead of the file above to get the following screen (looks somewhat more similar to the EDM screen):
Important
Download this .qss file from this link
Now let’s try to open our display with this old-stylesheet:
PYDM_STYLESHEET_INCLUDE_DEFAULT=1 pydm -m "DEV=MY:PV:HERE" --stylesheet old_style.qss mgnt_unit2.ui
Here is how it will look:
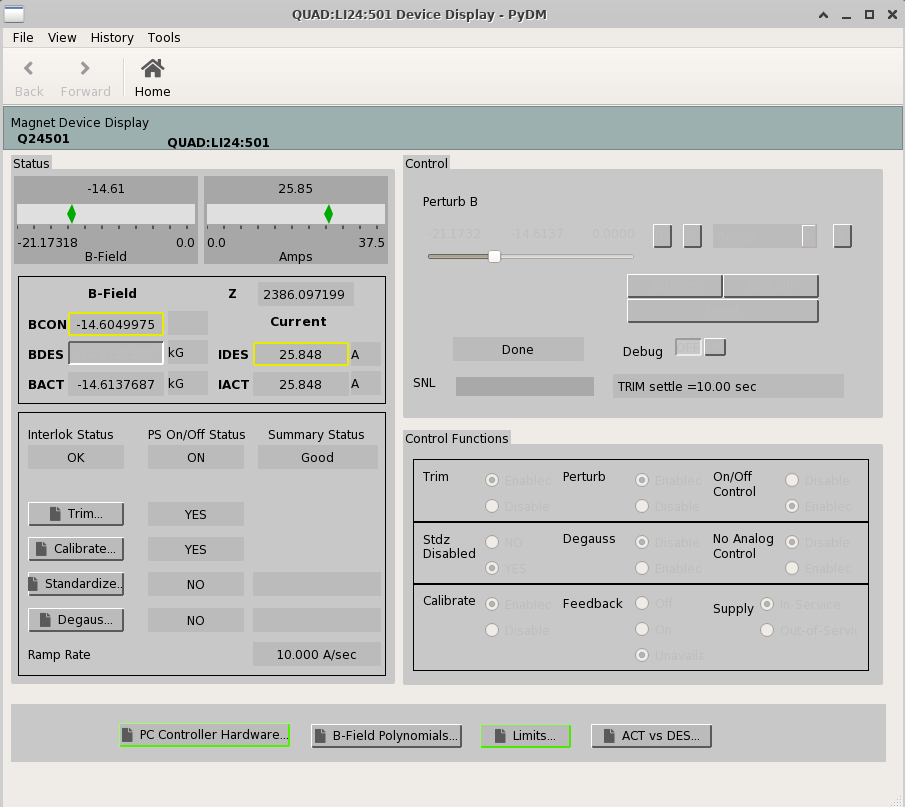
Notice that QT greys out the text when the widgets are not enabled, and in this case it is hard to see the text because we used a grey color for the background. To fix that we’ll have to add some additional things to the stylesheet file to say that we want the color to be black (or other color) when they are disabled:
widgets when
Disabled(might not need all of these):QPushButton:disabled{ color: black; } PyDMLable:disabled { color: black; } QLineEdit:disabled { color: black; } PyDMEnumComboBox:disabled { color: black; } PyDMEnumButton:disabled { color: black; } PyDMSlider:disabled { color: black; } QLabel:disabled { color: black; } QRadioButton:disabled { color: black; }
Note
In this old-style stylesheet file I also added a color for the main Widget which is a frame, so to distinguish it from other frames I also changed the object’s name as did for the banner, however this did not reflect when opening the screen, but reflected in the Qt Designer so I am assuming this is because the default PyDM stylesheet takes precedence and we must be defining the style of the main window in there.
Main Window:
QWidget[objectName="main_window"]{
background-color: rgb(145, 145, 145);
}
A workaround for this: in designer, add a top-level QWidget that acts as a container for your whole display. Then, apply the stylesheet to that. So the hierarchy is like QWidget -> QWidget -> Everything in your display.
Adding that additional QWidget seems to prevent the default stylesheet from clobbering your local styles, without preventing the defaults from working.
If you already have your scree completed, like we have here, we can simply create a new screen:
Go to
File->NewChange the dimentions to match the completed screen dimentions
Add a
QWidgetand expand it to the entire new screenGo back to the completed scree and select all widgets with
Ctrl+a, copy them:Ctrl+cPaste the copy widgets in the new screen that contains the
QWidgetas base withCtrl+vand while they are selected, drag them in proper location, as the pictures below show.
Add a QWidget and expand it to fill the new screen:
Copy and paste all the widgets into the new one, all at once:
Make sure to add a new property in the stylesheet for the new widget, for example I left the widget with its default name and added this in the .qss file:
QWidget[objectName="widget"]{
        background-color: rgb(145, 145, 145);
}
Now the screen should have a darker grey background:
Note
In PyDM when we don’t have access to the widgets, we’ll get a little circle that indicates that and a little message to tell us that access is denied.
Note
If we want to change the font for the entire application, one easy way to do that is to add the it in the stylesheet, for example if we want font Helvetica and font-size 9 we could add something like this:
Font:
* {
  font: 9pt "Helvetica";
}
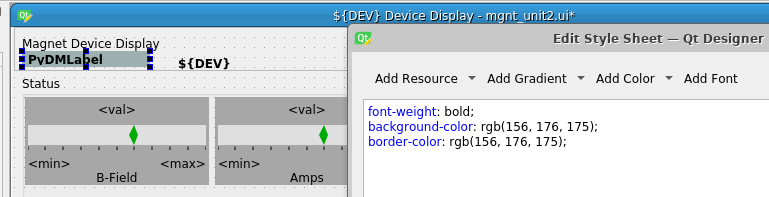
After I added this font to the stylesheet, I had to go back in QtDesigner and add a line to the stylesheet for the bold labels, so that it takes precedence over the one in the .qss file:
Select all of the bold labels, and on the right side in the properties area add the following:
font-weight: bold;
Just like in this immage:

Make sure to include the additional stylesheet properties for the label in the label in the banner:
Important
The .qss files here designed specifically for the screen we worked on, if you want to use these .qss files you might have to add more to the stylesheet for widgets we have not covered.